Intellij Plugin: Create Gql Formatter Plugin
We will create a GQL Formatter Plugin
This is what we are going to create: Plugin link: https://plugins.jetbrains.com/plugin/14709-gql-formatter/versions/stable/92155 Full source code: https://github.com/rahul-lohra/gql-formatter-plugin
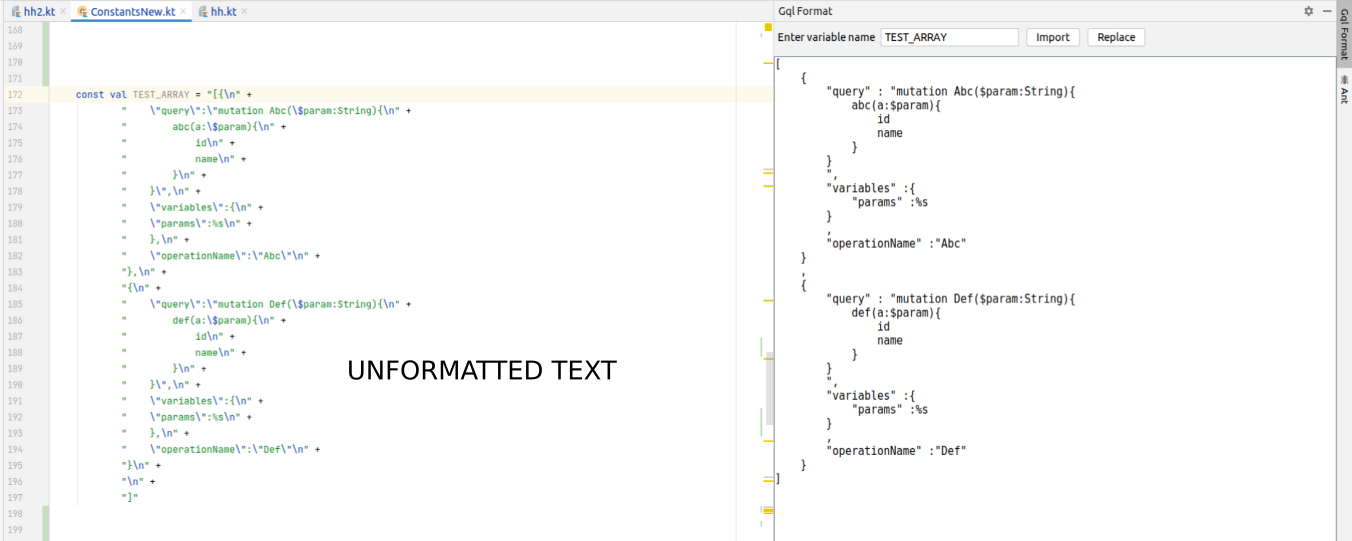
Before formatting is applied
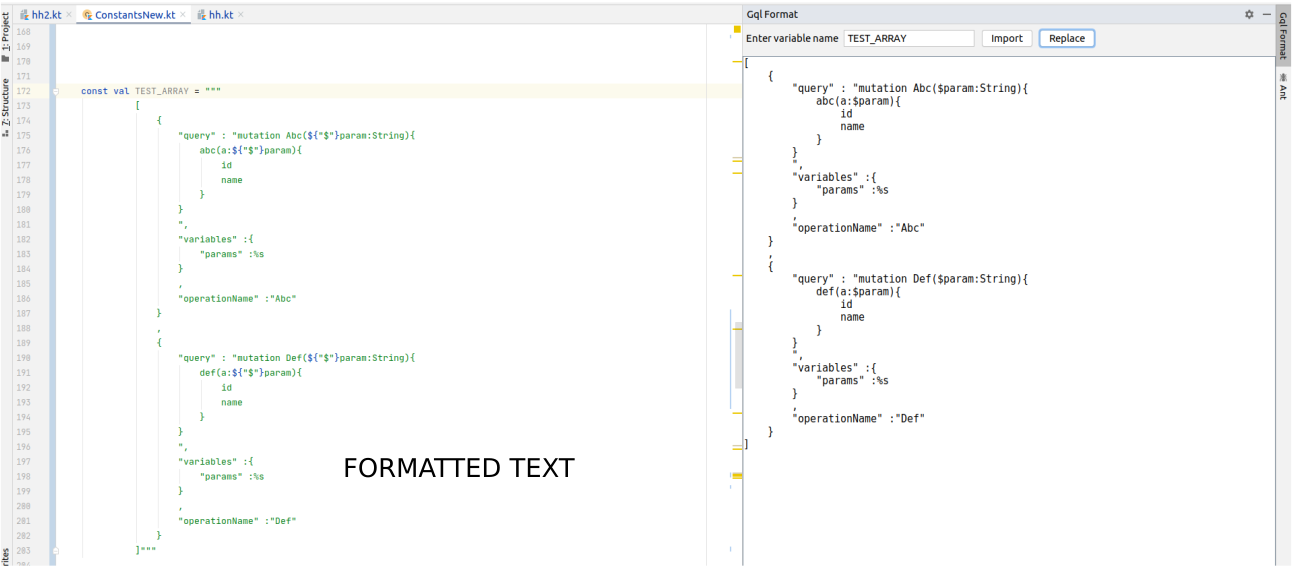
After formatting is applied
The language used is Kotlin but the concepts will remain same so don’t worry if you don’t know Kotlin
What it does:
- It will reformat your GQL query that is stored in some variable (The idea is very similar to JSON Formatter)
- You can then replace this formatted GQL query into that variable
What do we need to do to build this
- We will need a UI where we will see our formatted code
- We need to read the code from the file
- We need to write th formatted code back to the file and override the variable’s value
Concepts that will be used:
- Editor
- Tool windows (Swing GUI)
- File Reading/Writing via PsiElementVisitor
- Creating PsiElement (String template)
Why do we need it: To keep our GQL query code consistent across our project and it is also readable now
We have to cover these parts:
- Setup basic project to develop plugin
- Create UI where we will see our formatted Code
- Format GQL query with our code
- Paste the code back to the source code from your tool window
- Few things about publishing plugin
1. Setup Basic Project
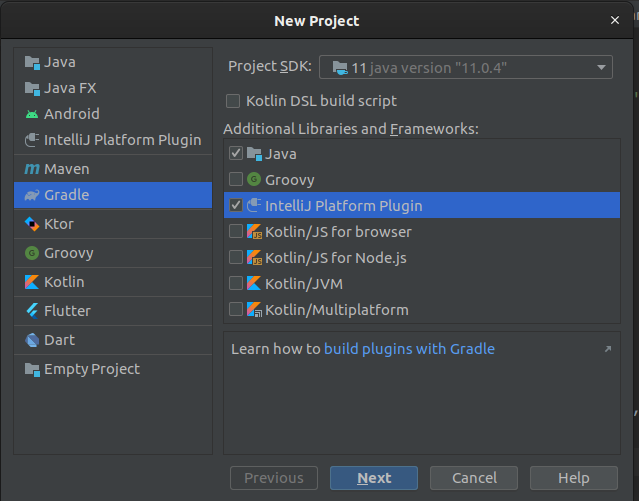
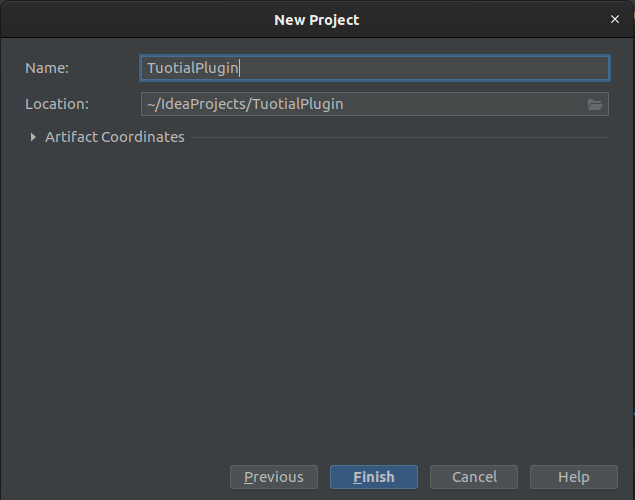
Click on the finish. Beware this project will download at least 500mb of data for every time you will create an IntelliJ Platform Plugin. Actually it will download IntelliJ SDK.
But we can avoid that and use from local (This is totally optional)
Original(default) build.gradle
plugins {
    id 'java'
    id 'org.jetbrains.intellij' version '0.4.21'
}

group 'org.example'
version '1.0-SNAPSHOT'

repositories {
    mavenCentral()
}

dependencies {
    testCompile group: 'junit', name: 'junit', version: '4.12'
}

intellij {
    version '2020.1.1' // this is reason for 500mb download
}
...
Now we need to pass local path of IntelliJ like below:
intellij {
    localPath "/home/rahulkumarlohra-xps/IdeaProjects/ideaIC-2020.1"
}
//If you get some errors like annotations not found then make them available like this
dependencies {
    compile group: 'org.jetbrains', name: 'annotations', version: '19.0.0'
}
Like to build.gradle: https://github.com/rahul-lohra/gql-formatter-plugin/blob/master/build.gradle
Let’s see one more file which is auto-created: plugin.xml
You might get some error initially, it is basically like a warning that you should enter the values for name,description,vendor details
Few tips:
id: Should be your package name and should be uniquedescription: You can use HTML tags here
2. Create UI where we will see our formatted Code
This is what we will create

Functionalities of this tool:
- Import: It will get the value stored in the variable which is provided in this white box
- Replace: It will set back the formatted value to the original source code file
This is how it will look once we have filled some values on it

(Optional)We are going to create a Swing GUI. If you are new to Swing GUI then watch this video to understand how to create Swing GUI : https://www.youtube.com/watch?v=5vSyylPPEko
Follow these steps to create the UI
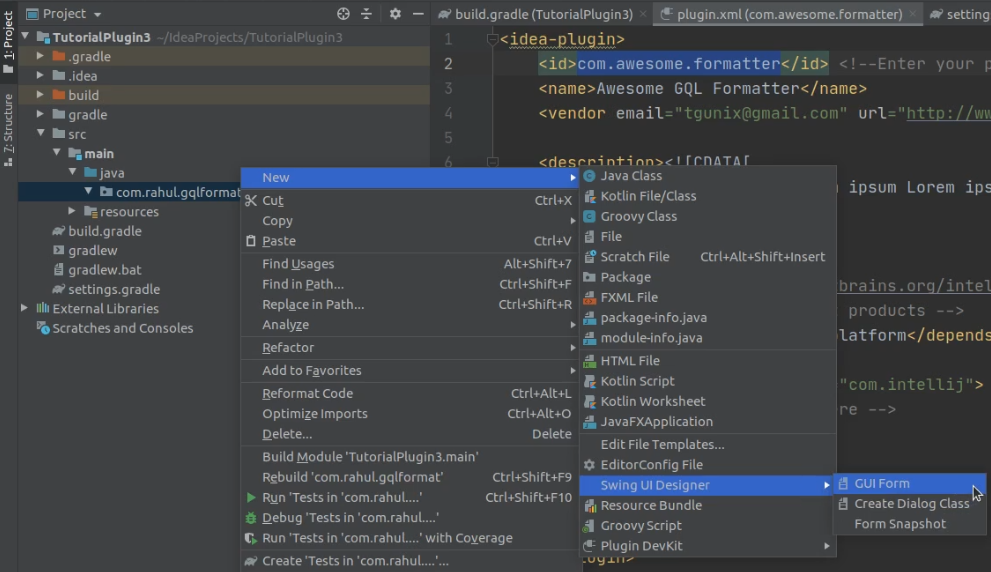
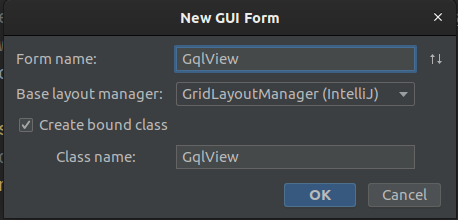
After tapping on OK : Two files will be created for and those are:
- GqlView.java
- GqlView.form
GqlView.java
This file will contain all the UI elements as member variables and you can add listeners to these views
All the member variables are auto-generated and they automatically linked with their respective UIs
GqlView.form
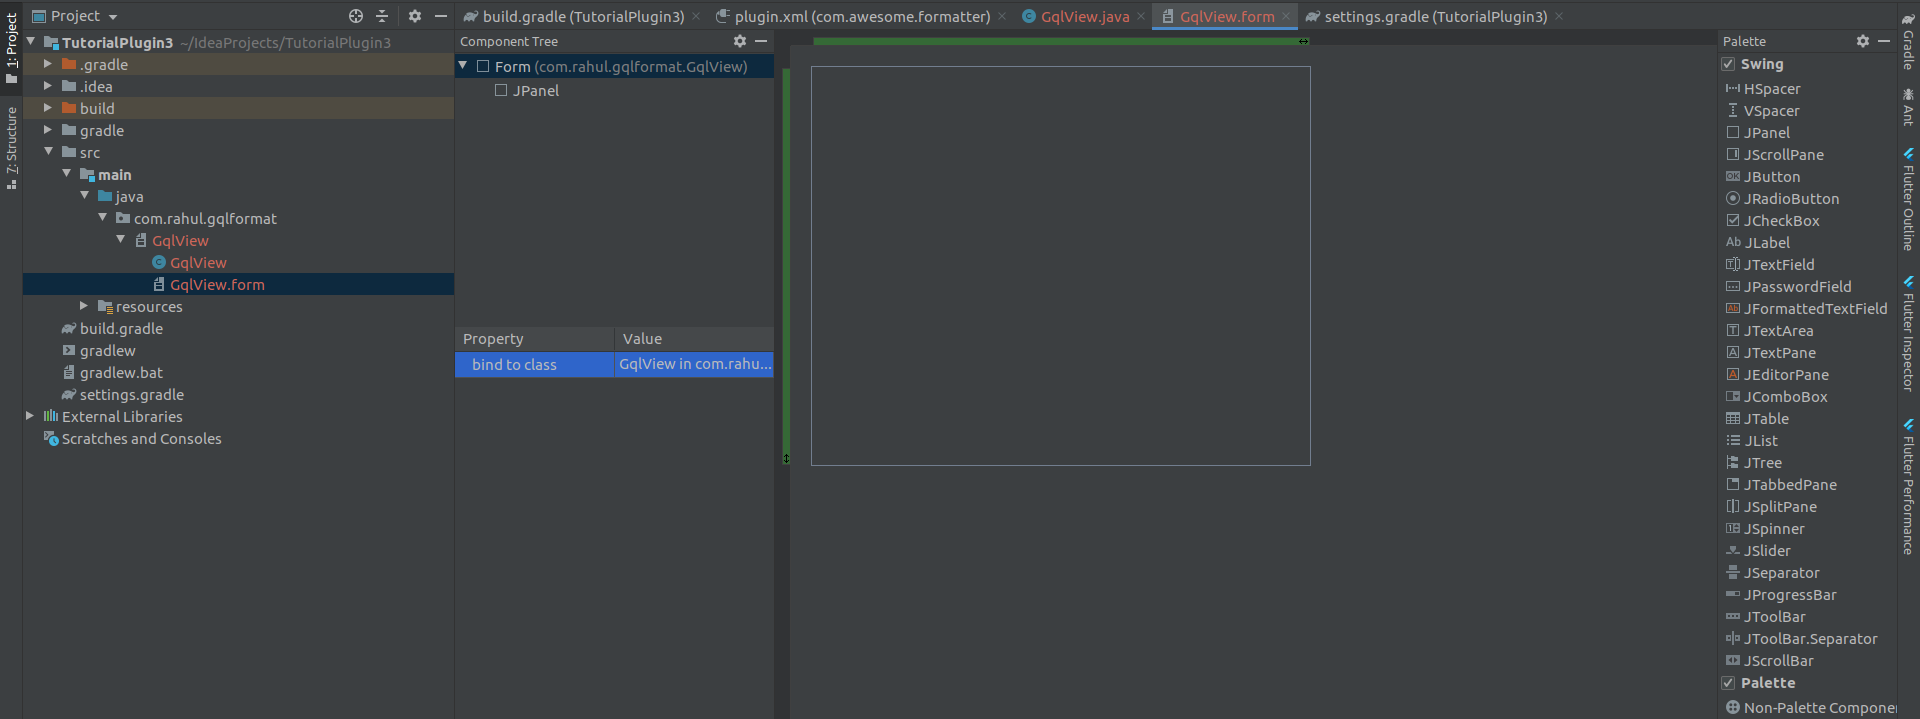
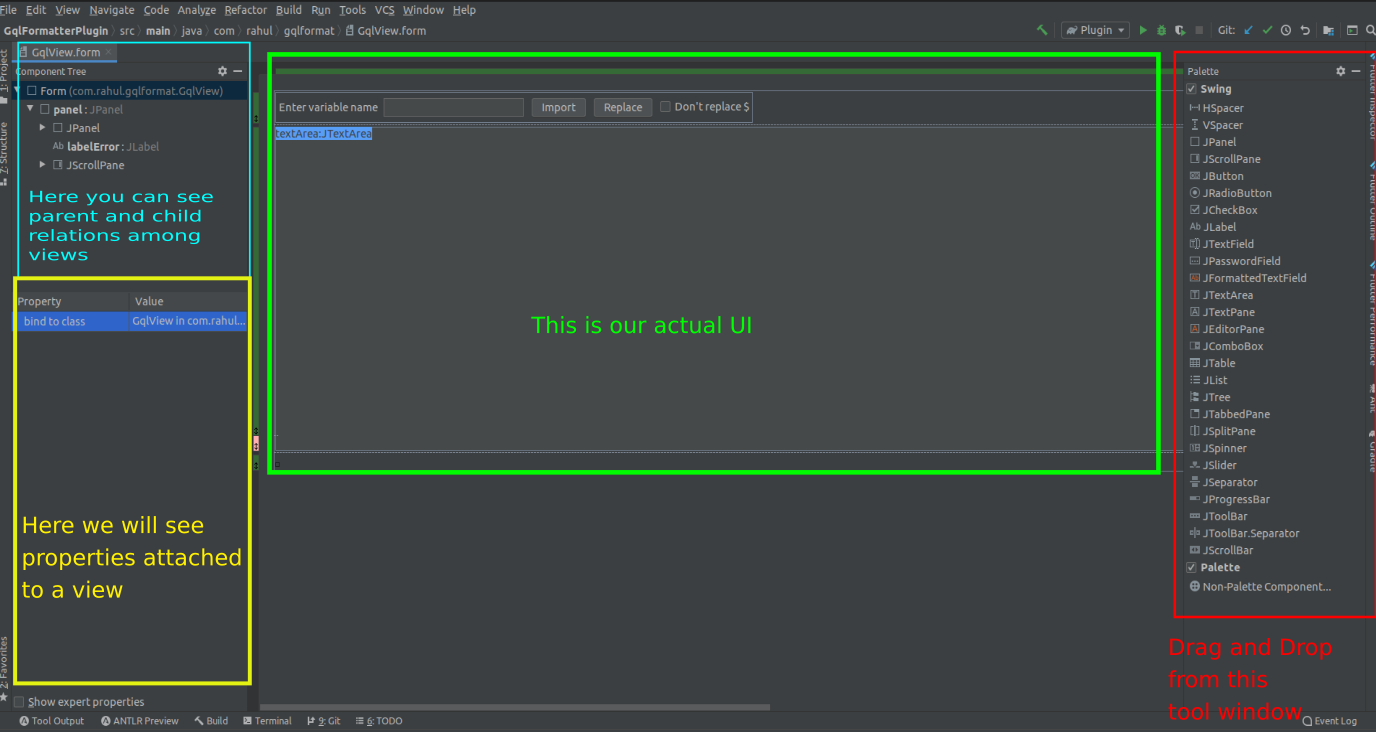
This is actually an XML file that contains all the Swing UI elements and also how each one they are relatively placed(positioned) The IDE generally do not allow us to directly edit this XML file. It has its own drag and drop user interface to create the UI. In the below picture, you can see the
- Palette window to the extreme right.
- Component Tree
- Actual UI
This is how the GqlView.form should look initially, right after it is created
Use this Two code snippets to create the final UI
After copy-pasting the content we should see UI like this:
Since we have manually edited the GqlView.form so that’s why we also need to manually edit the GqlView
The UI should be ready now
Add this UI to a Tool Window
Things to do
- Create a class that will be registered as Tool Window (creation + registration)
- That class should also render the UI that we just created (Connect that class to our UI class)
Create Toolwindow
We have 2 things
- Implement
ToolWindowFactory: this class will be registered later override createToolWindowContent: In this method, we are just attaching the UI to thisToolwindow
Register the Toolwindow like below on plugin.xml
id: It will be the name displayed over yourtoolwindowanchor: Position where the toolwindow will be displayedfactoryClass: Points to our newly createdToolWindowclass
3. Format GQL Query with our code
I have already written code for this. No explanation needed, but you can see some of the examples of GQL query to get an idea of that: https://graphql.org/learn/queries/
This is my code(might be difficult to understand so feel free to skip it): https://github.com/rahul-lohra/gql-formatter-plugin/blob/master/src/main/java/com/rahul/gqlformat/parser/NodeCreator.kt
Let’s just say we have an API to get formatted GQL Query:
val nodeCreator = NodeCreator()
val node = nodeCreator.createNode(unformatted text)
val nodeText = nodeCreator.prettyPrint2(node, offset)
The nodeText will return the formatted GQL query
Now we need some logic(or API) to get variable’s value which is in our kotlin file. You can say we have to parse our code and extract the necessary information. To do this we have to understand a new concept PSI (It’s super easy don’t worry)
PSI : Program Structure Interface : Its responsible for parsing your file and getting meaningful data from it. Like it you can directly go to any comments, or variables or any functions. (link: https://jetbrains.org/intellij/sdk/docs/basics/architectural_overview/psi.html)
PsiElements: A file is represented as tress of PsiElements. (link: https://jetbrains.org/intellij/sdk/docs/basics/architectural_overview/psi_elements.html). It is very similar to the Tree data structure where you have many nodes connected to each other and every node might have some special property. Eg one of them can be a function or a comment or a class name or a string value or import statements
To visually see how it looks you can do this
- Navigate to any file
- Tools -> View PSI Structure of Current file
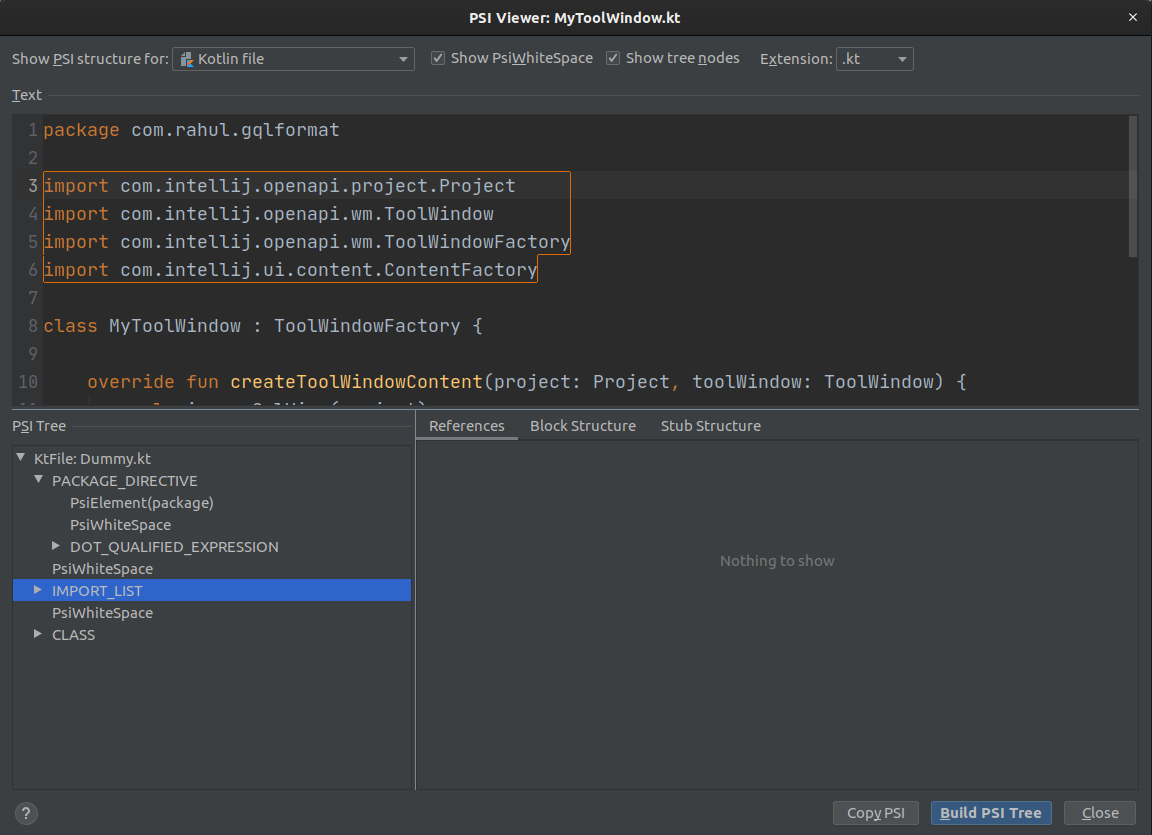
Now we need a way to navigate through this PSI elements and find our variable where the String is stored
We will use KtTreeVisitorVoid from package org.jetbrains.kotlin.psi. It will help to navigate through Kotlin’s PSI Element. If you want to parse a Java file then you can use JavaRecursiveElementVisitor.
To use
KtTreeVisitorVoidwe have to add its dependency. One thing to note is we need to add dependency onplugin.xmlbut not onbuild.gradle, like this:
<idea-plugin>
....
    <depends>org.jetbrains.kotlin</depends>

    <extensions defaultExtensionNs="com.intellij">
         <toolWindow
            id="Gql Format" anchor="right" factoryClass="com.rahul.gqlformat.MyToolWindow">
         </toolWindow>
    </extensions>
....

</idea-plugin>
Here is the documentation of plugin dependencies: https://jetbrains.org/intellij/sdk/docs/basics/getting_started/plugin_compatibility.html#declaring-plugin-dependencies
Add logic to parse the file
We will create a class named EditorLogic.kt : it is responsible for
- Get currently opened file
- Traversing the code
- Extract the value assigned in variable
- Pass that value to our NodeCreater (it will reformat the GQL)
- Paste the formatted value into the ToolWindow
-
Replace the original value with our formatted value from ToolWindow
-
Currently opened file: will use FileEditorManager to get current PsiFile
-
Code Traversal: we will use KtTreeVisitorVoid
-
Value Extraction: override visitProperty(property:KtPropery)
-
Passing value does not require any explanation
- Pasting value to our Toolwindow: we will do this : textArea.text=”our formatted text”
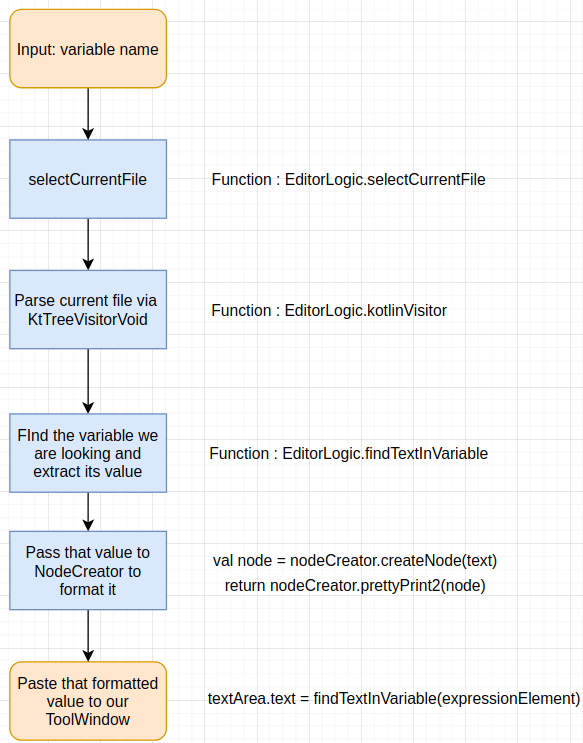
This diagram will be useful to understand the code flow from our input till we paste the formatted code to our tool window
Explanation of keywords:
KtBinaryExpressionKtStringTemplateExpressionKtDotQualifiedExpressionOur intention is to extract the assigned value(String) from the variable. But the assigned value can be of above different types(there can be more) Here are the examples for the above elements

Now we need to see how we are passing the variable name. It’s a simple click event added on the button Import of our ToolWindow

Cool now we should be able to at least see the formatted GQL query in our tool window
4. Paste the formatted GQL query back to our file
Things to do:
- Replace existing
PsiElementwith formattedString: Means we have to create a new PsiElement and will need to store formatted String into it and then need to replace it with the original PsiElement which has an unformatted query - Use proper indent(optional)
- Handle dollar sign: because Kotlin treats dollar sign in a different way, for eg it can be used as a placeholder and much more
Replacing PsiElement
API to replace PsiElement is very simple:
PsiElement.resplace(newPsiElement)
And we just need to wrap this inside another block else we will get exceptions:
WriteCommandAction.runWriteCommandAction(project) {
    oldPsiElemet.replace(newPsiElement)
}
This is how we are creating newPsiElement
val newPsiElement = KtPsiFactory(psiElement.project).createStringTemplate(text)
Use proper indent
We need to know where should we start our string. In the below figure we need to know how FAR the variable is from the left

We have an api for this: it will tell give us the column no(start point) of the variable
val editor = FileEditorManager.getInstance(psiElement.project).selectedTextEditor
val variableCol = (editor as EditorImpl).offsetToLogicalPosition(psiElement.parent.textOffset).column
Here the PsiElemt refers to the String value, that’s why we have taken psiElement.parent
Dollar Sign
- As of now, we are changing
$to${“$”} ${“$”}will be ignored
We have used regular expression for this, the code might look difficult, but it’s very easy, just go through it doesn’t require any explanation
Cool.. we have covered all the logics. In short, this is what we did:
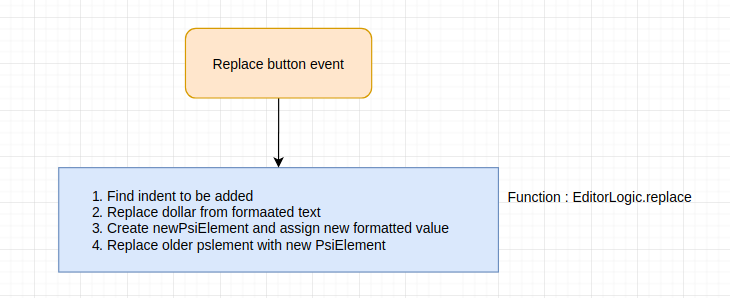
Full source code of EditorLogic.kt : https://github.com/rahul-lohra/gql-formatter-plugin/blob/master/src/main/java/com/rahul/gqlformat/EditorLogic.kt
5. Few things about publishing plugin
This is very straight forward and easy and there are multiple ways to upload.
From Gradle: https://jetbrains.org/intellij/sdk/docs/tutorials/build_system/deployment.html
I am showing you the simplest one. You can follow this guide: https://jetbrains.org/intellij/sdk/docs/basics/getting_started/publishing_plugin.html It is basically
- Login to JetBrains account
- Choose upload plugin
- A form will be displayed and it will ask for jar/zip You can run this command from your root project to get the jar/zip
./gradlew buildPlugin
This will create a zip or jar in build/distributions/plugin-name.jar
You can upload this file on their site
After uploading the plugin, kindly fill as much information about your plugin as you can. Like: How to use, what things are supported, put screenshots, video links else the reviewer will tell these things to you
Full source code: https://github.com/rahul-lohra/gql-formatter-plugin
Plugin link: https://plugins.jetbrains.com/plugin/14709-gql-formatter/versions/stable/92155
Thanks for reading Please feel free to correct anything if something is wrong